


Create support for your own framework in ORM Designer, part VI – import / export
Part VI: How to define an import/export from ORM Designer model to ORM
Now lets look on next important step for ORM framework support implementation into ORM Designer. It is a data import and export between ORM Designer and ORM framework. Both of these steps are implemented separately and don’t have to solved at all. In some framework for example it isn’t needed or possible to do import. That’s why only a support for data export from ORM Designer into ORM is created. In order to make import/export as flexible as possible, XML script language springing from Phing language syntax is used for script writing.
Firstly lets show how to set in our configuration which scripts should be used for import/export:
<orm-configuration
  name="AtomixORM"
  script-import="AtomixORM.import"
  script-export="AtomixORM.export">
</orm-configuration>
<framework-configuration name="AtomixMVC">
  <supported-orm
    name="AtomixORM"
    script-import-files-scanner="AtomixMvc.import.scanner.AtomixOrm">
  </supported-orm>
</framework-configuration>
During ORM framework configuration is possible to enter 3 different scripts:
- script-import: script used during model import into ORM Designer
- script-export: script used during export from ORM Designer to ORM definitions
- script-import-files-scanner: script serving to automatic finding of all definition files during automatic import
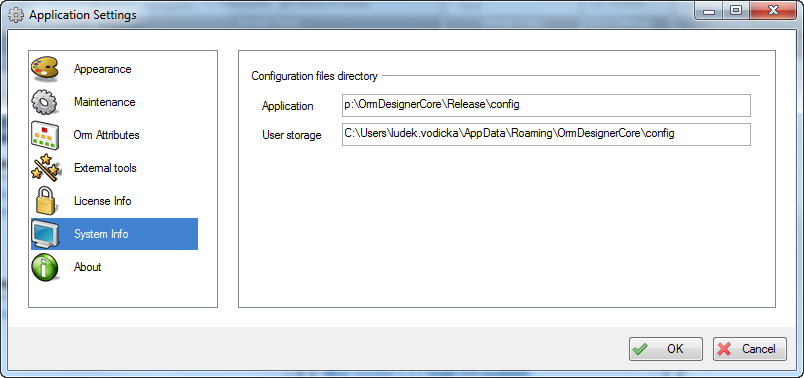
ORM Designer automatically loads all the scripts which are saved in files with mask *.uscript.xml. These files can be stored in anywhere in %ORM_Designer_Path%\Config or in %User_Application_Data%\OrmDesignerCore\config. Concrete location of these files can be found in ORM Designer configuration window at System Info tab:
Script files
Now we are going to show how the file with a simple script looks like. In directory %User_Application_Data%\OrmDesignerCore\Config\AtomixORM we create a file AtomixOrm.uscript.xml. Into this file we enter following XML fragment:
<?xml version="1.0" encoding="utf-8" standalone="no" ?>
<uscript>
  <!-- ========== AtomixMvc.Import.Scanner.AtomixOrm ========== -->
  <function name='AtomixMvc.import.scanner.AtomixOrm'>
    <check>
      <is-set variable='directory'/>
    </check>
  </function>
  <!-- ========== AtomixORM.Import ========== -->
  <function name='AtomixORM.import'>
    <check>
      <is-set variable='lstFiles'/>
      <is-set variable='projectID'/>
    </check>
  </function>
  <!-- ========== AtomixORM.Export ========== -->
  <function name='AtomixORM.export'>
    <check>
      <is-set variable='projectID'/>
      <default variable='exportToOneFile' value=''/>
    </check>
  </function>
</uscript>
By this we have created the scripts which will be executed during the data import or export.
Initial values description
Each script has several initial values which we check by the command <check>. Here is their list.
- Import script
- lstFiles:a list of files to import
- projectID: project ID to which the files should be imported
- Export scirpt
- projectID:project ID from which we will export
- exportToOneFile: This variable determines an output file of project export when project have to be exported to one file.
- Import scanner scirpt
- directory: Determines a directory in which the files for import should be found
Conclusion
In this article we have shown how to configure and create basic scripts for ORM Designer. In next parts of serial we will step by step describe how to implement single scripts together with the explanations of some script language commands. If you have any question about this or following chapter, don’t hesitate and ask us directly here on the blog or you can contact us at [email protected].