We’d like to introduce you our improved color picker in ORM Designer which is available from version 2.1.12. You can download it HERE.
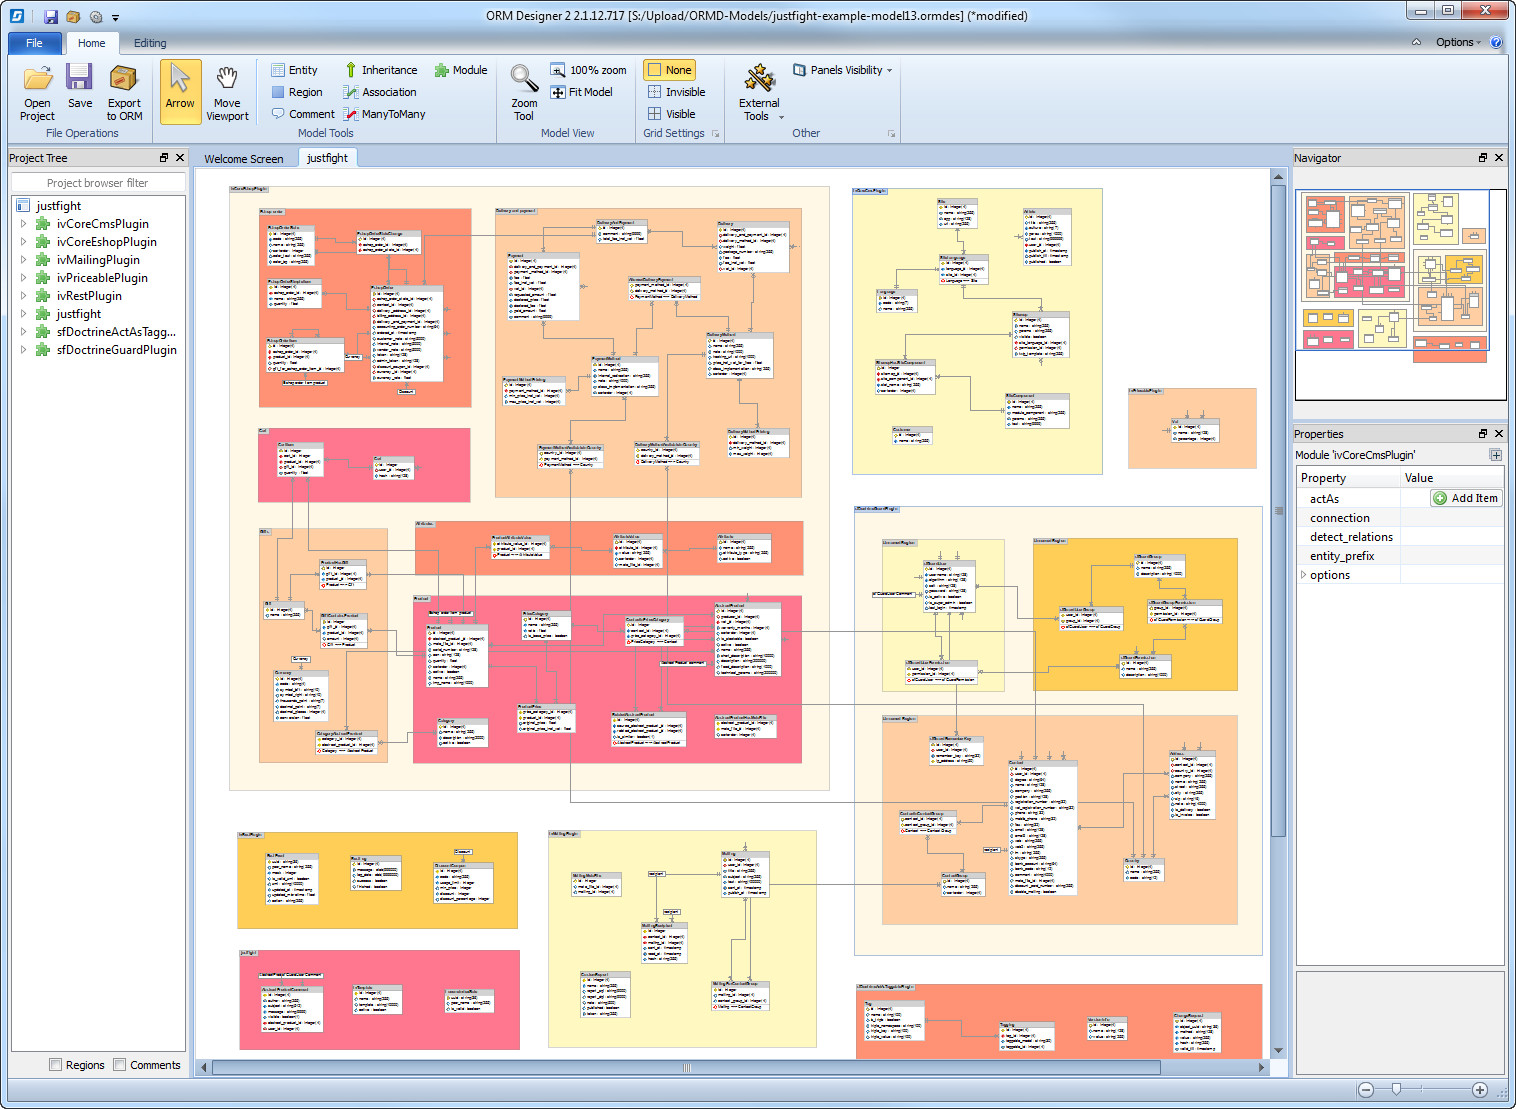
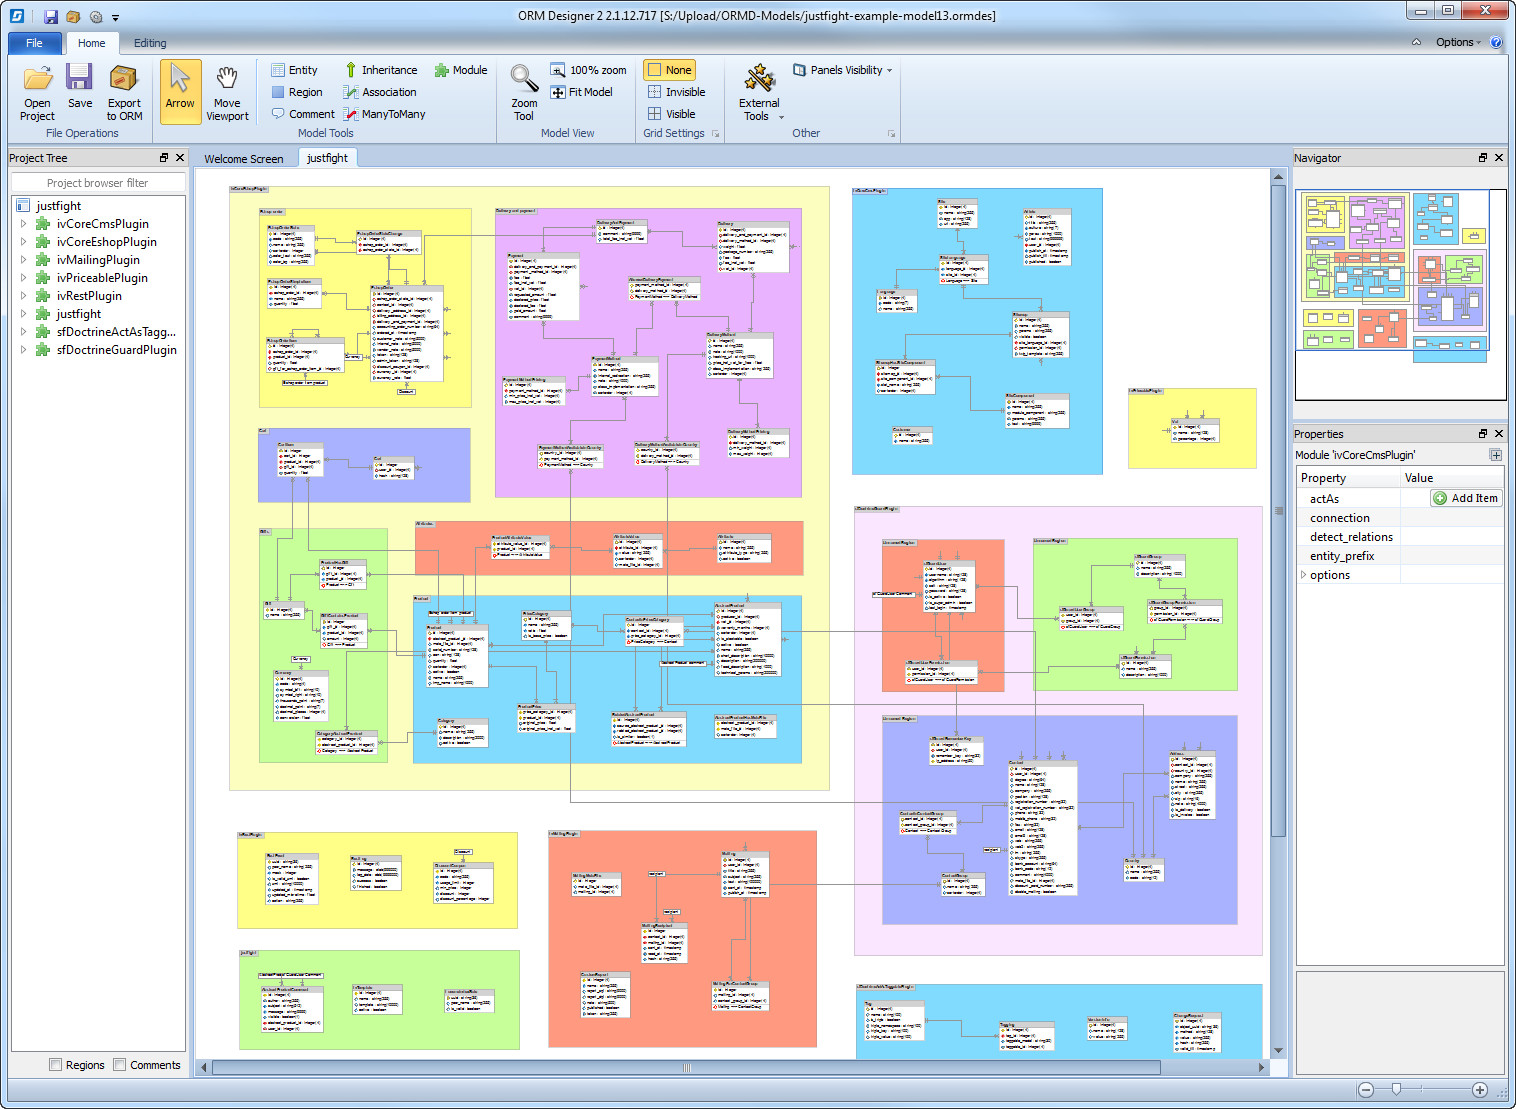
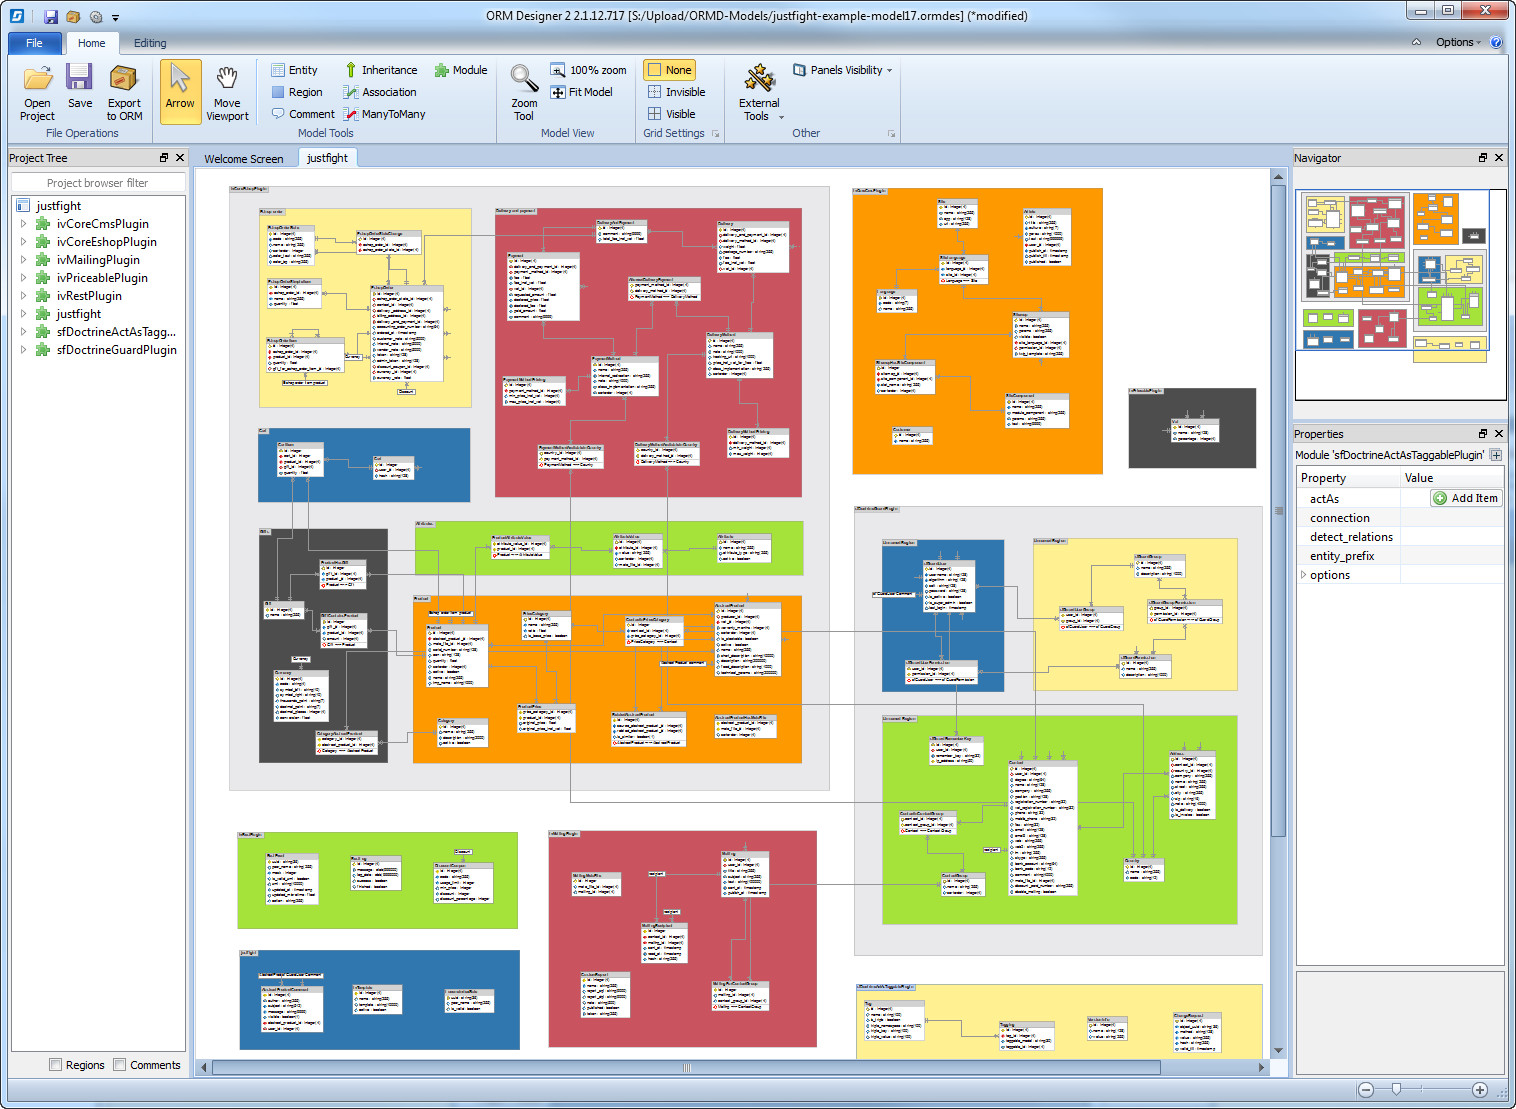
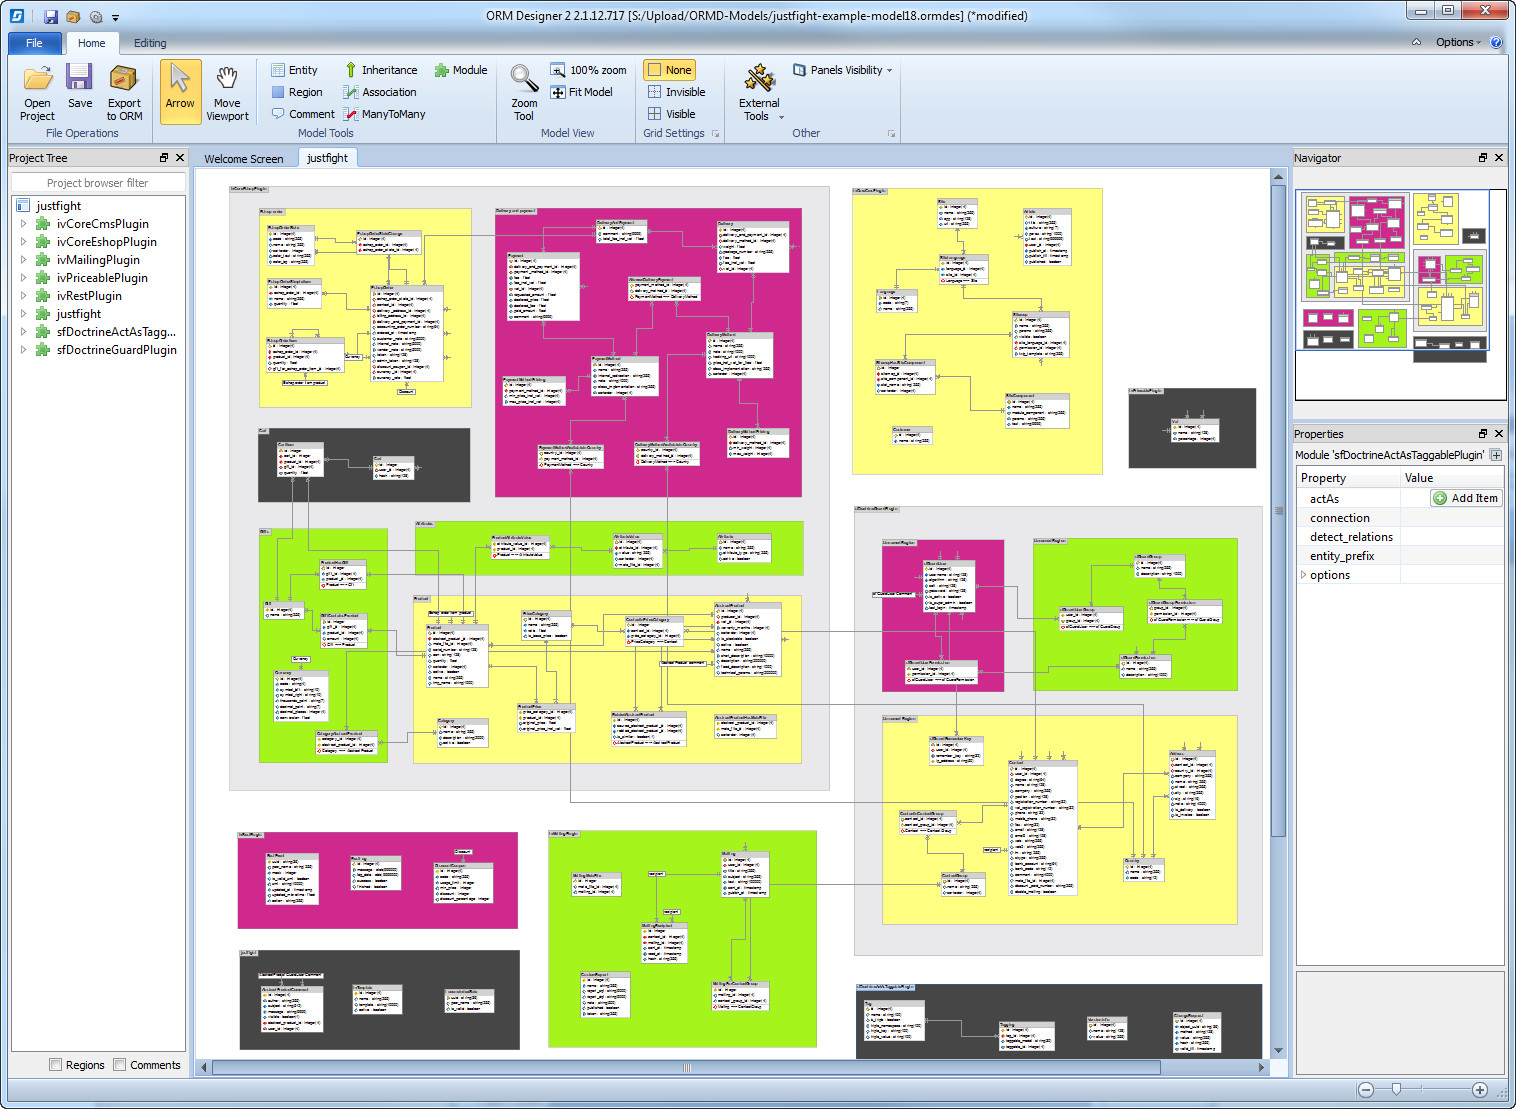
From now you can create nice and well arranged models quickly and simply so they will be easily readable for you and your colleagues.
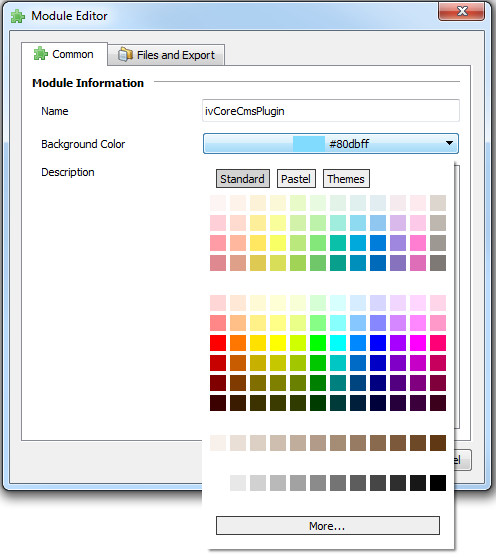
Use your favorite colors to distinguish your project modules and regions. With the same color tones you can also highlight the ORM elements which are related. With color picker you can also colorize the comments in your model.
Simple and user friendly
To colorize the region or module use double click on required area and open the color picker.
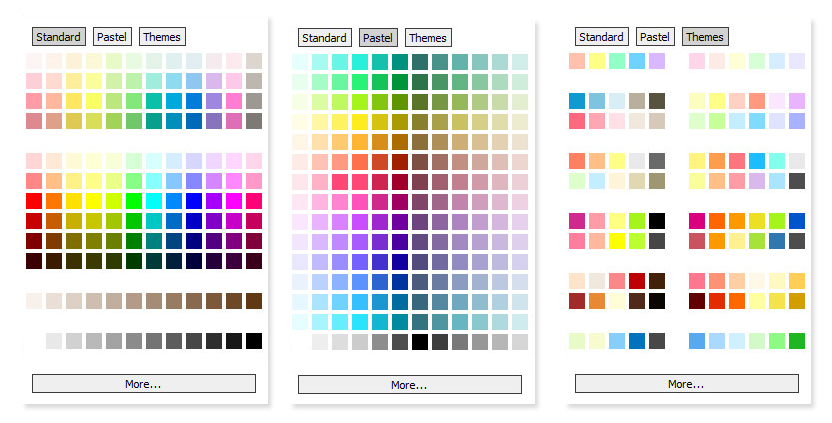
You can choose from 3 color pallets. Select your favorite colors from basicor pastel pallet and mix the colors according to your preferences. Or you can simple use pre-defined color themes from the third bookmark.
For your inspiration here are examples of color themes usage.
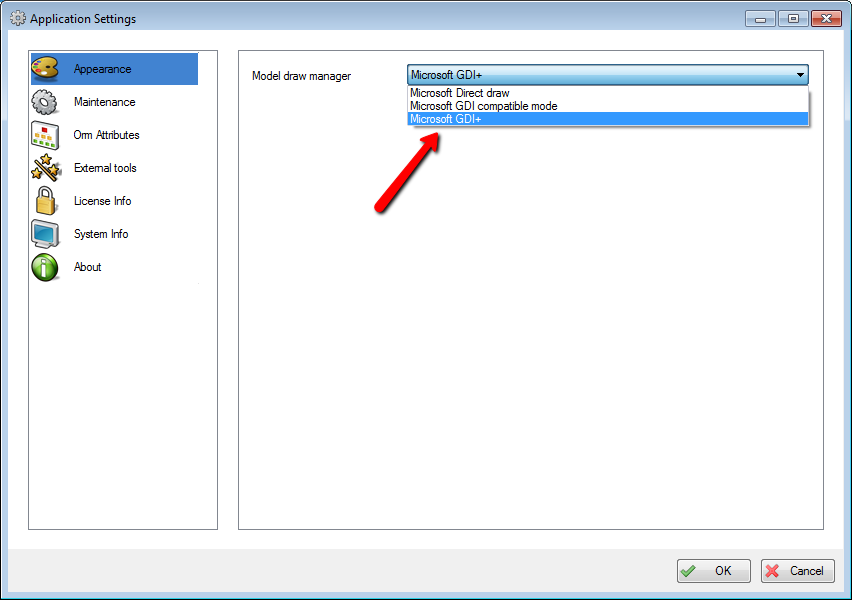
If you don’t see icons on the left of the field names, some Direct 2d drivers are probably missing or are out-dated on your computer. You can try to update Direct 2d drivers, or you can try another Drawing manager in ORM Designer.
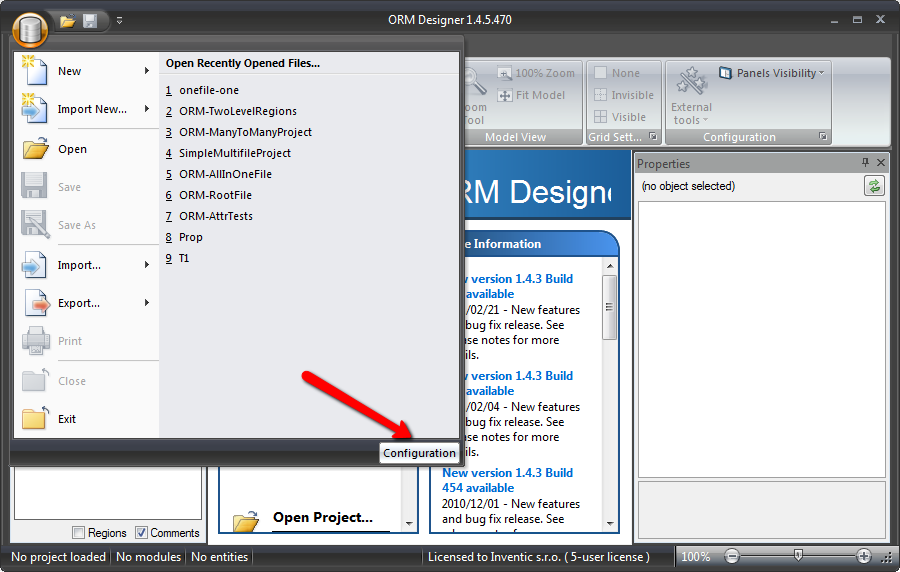
To change Draw Manager open “Configuration window”
And change DrawManager to Microsoft GDI+ or Microsoft GDI compatability mode.
This settings might resolve your problem with missing icons.
Note: This feature is currently available only in beta-version 1.4.5. If you want to try it, please download latest version from http://www.orm-designer.com/beta.
Another news for Propel ORM users! Today I want to introduce you new Behaviours support feature.
ORM Designer supports two ways how to handle behaviours. The first way uses predefined behaviour list of already known behaviours, the second way uses customBehaviour type to define any behaviour by it’s name and params.
Use of custom behaviors
For setup custom behaviour to any of your tables, follow next steps:
Mark the requested table
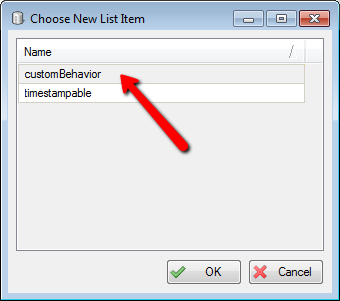
In ORM Properties list click “Add item” next to “Behaviors” property
Select “customBehavior” from the list
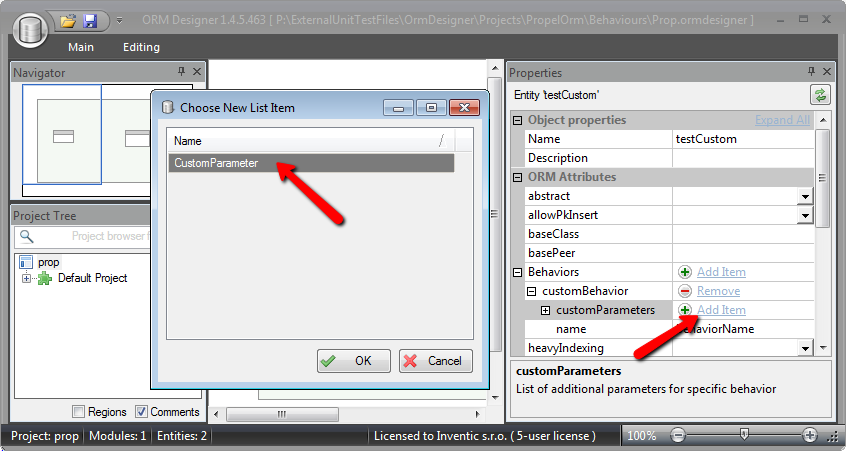
Enter behaviour name to relevant “name” property
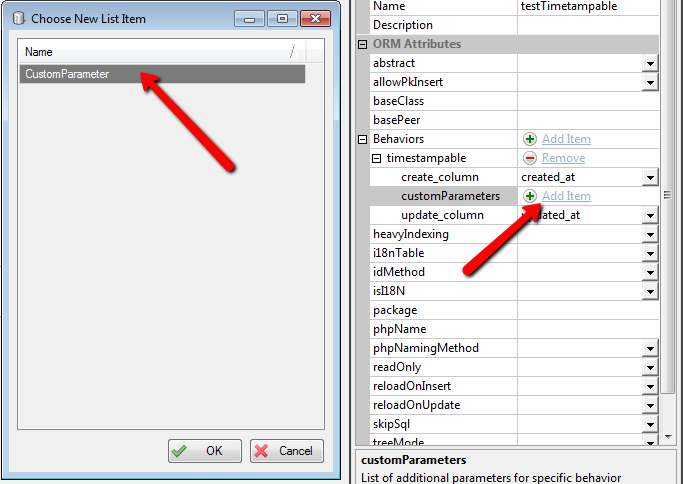
If your behavior has some parameters, add them by using “Add item” next to “CustomParameters” property
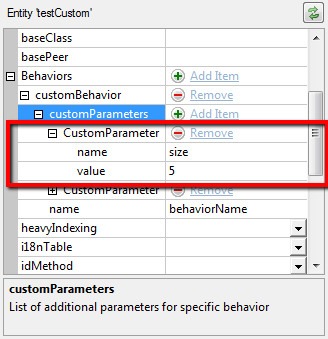
After that you have to enter the parameter name and the parameter value. You can add unlimited number of additional parameters.
And this is it ;-). Now when you export your model, you can see definitions like this:
Use of predefined behaviours
Using of predefined behaviours is better than custom one in several ways. As first, you don’t have to write behavior name again and again but you can simply select it from a list. The same thing is for the behavior parameters. The second advantage is that for specific parameter values there is an automatic completion and offering of preferred values (booleans, column names, … ). Now I show you how to define “Timestampable” behavior for a specific entity.
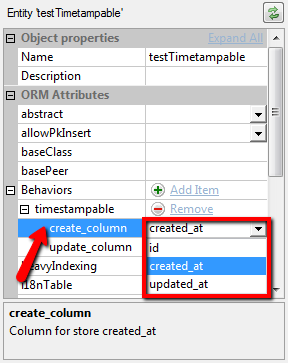
The first steps are the same as in the previous example. Select the requested entity, click “Add item” next to “Behaviors” property and select desired behavior. In our example “Timestampable”.
Now you can configure timestampable behavior by using two predefined properties “create_column” and “update_column”. When you click on the arrow next to property value, you can simply choose the one of available columns.
Each predefined behaviour has also an option to define another additional behaviour parameter. This can be simply achieve by using “customParameter” as well as in the case of the custom behaviors.
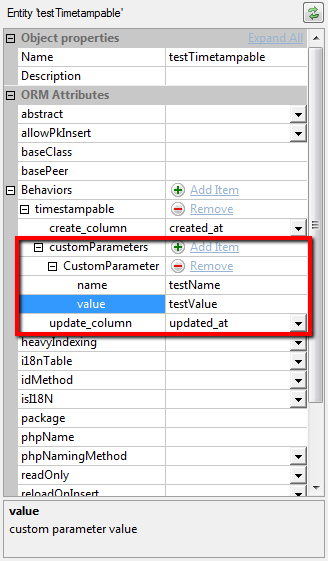
When you add one or more custom parameters you can simply configure them.
List of currently supported Propel ORM behaviors:
NestedSet
SoftDelete
Sluggable
Timestampable
Sortable
Aggregate
Versionable
I18n
Query Cache
AutoAddPk
Alternative Coding Standards
Note: Remembr that you can anytime use customBehavior if you need to use behavior not listed in list above. If you find any behavior which is common for more users and isn’t listed here, let us know and we will add it to ORM Designer configuration.
I hope you like this new function and as always if you find any bug or have any idea feel free to let us know!
Note: This feature is currently available only in beta-version 1.4.5. If you want to try it, please download latest version from http://www.orm-designer.com/beta.
While working on a new ORM Designer version we prepared one significant improvement of the current ORM Designer version for all Propel ORM users.
From now, ORM Designer natively supports all Propel core PHP validators mentioned in the documentation.
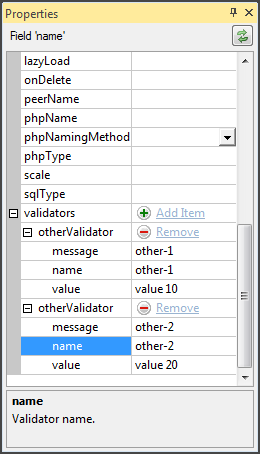
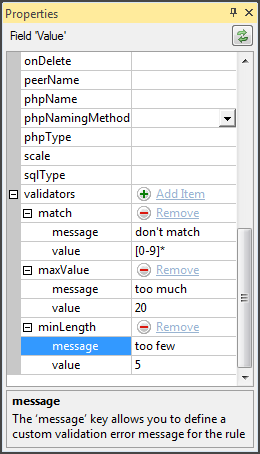
The usage is simple, as usually ;-). Create an object, add few fields and commit changes. Then select desired field of the model and look to the ORM Properties editor:
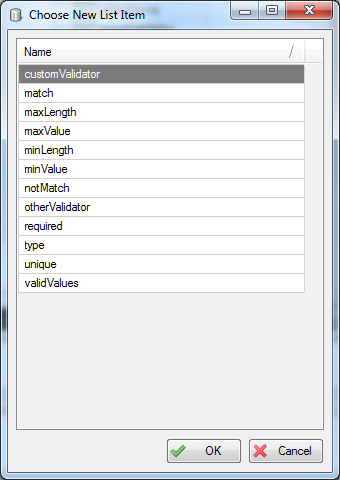
Now, when you click on the add icon you can choose from the list of available validators or choose one of two special items “otherValidator” or “customValidator”:
OtherValidator use in special cases when you want to use validator which isn’t listed in this list. This validator choose if you would like to enter all validator identificators like name,value and message and these values will be added to the specific column.
CustomValidator is there for cases when you have implemented your own validator and want to use it in a specific column. In this case simply add a class name to this validator and ORM Designer will export it for you.
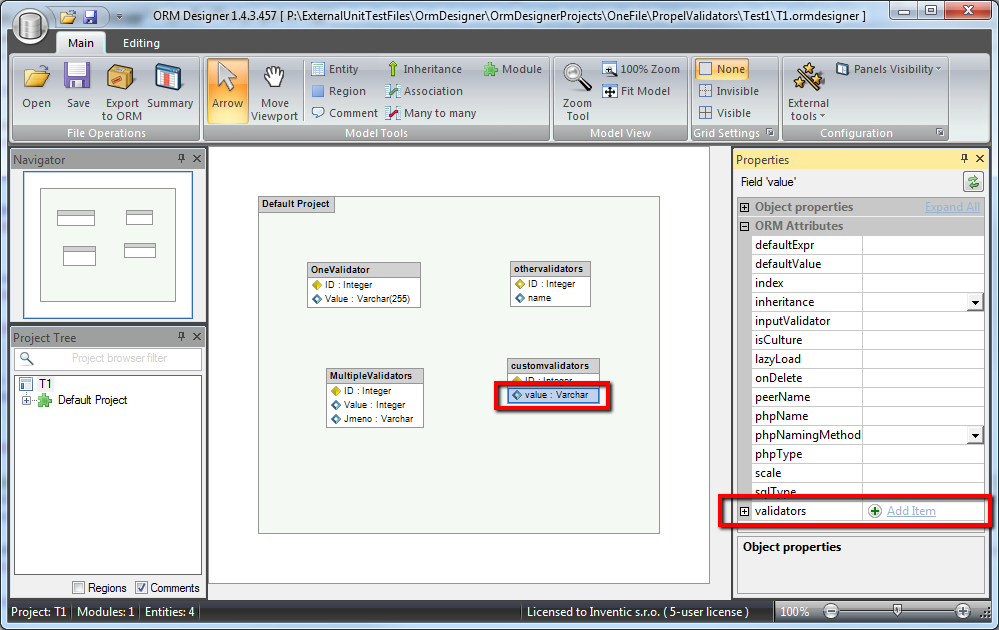
You can have zero,one or more validators of one type for one column because of multiple instances of custom or other validator. Here are few examples of already configured validators:
Now, when you press “Export” button, your XML file will look like this:
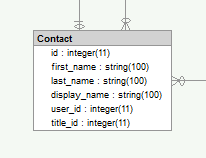
Today I want to show you a new small feature in ORM Designer 1.4.2 which helps you with navigation in the model. Until now, ORM Designer has shown only three different icons in a column for primary keys, foreign keys and other columns. Today we have added another three types for differentiation of NULL and NOT NULL columns. Empty diamonds beside the column names symbolize columns where NULL is allowed, filled diamonds where value is requried.
In this short article I want to show you how to execute another application from ORM Designer script. Since the version 1.4.2 ORM Designer has built-in a new script command called “execute-file” serving to launch the foreign applications from script. (1.4.2 is now obsolete, please download latest version from //http://www.skipper18.com/en/download)
Execute-file command
As first, let me show you the simplest way how to use this command.
Using this snippet we defined a function called “Test” which launch our testing .bat file with parameter ‘unit-test’. Whole command syntax is defined in XML Schema file script.xsd and looks like this:
By using parameter “working-dir“ we can specify a working directory for executed command. If no param is passed, the directory where executable file is located is used. Parameter “show“ serves to launch application in invisible mode and parameter “wait-for-exit” servers to wait until external application has finished its work and then continues with script.
Overloading export script
Now let me show you another new feature of ORM Designer 1.4.2. It can happen that you need to call your own executable when ORM Designer finishes export from model to ORM framework definition files. So we prepared new overloading points in export script, where you can write your own functions which will be called in this points.
Overloading basis
Method overloading in ORM Designer script is processed by method names and prefixes. The simplest way is by defining a function with specific name. ORM Designer runs this function when it is available.
Sometimes we need to distinguish functions for concrete type of ORM. In this case ORM Designer offers prefix overloading ability. ORM Designer tries to find several prefixes when searching for specific function.
These prefixes have fixed order and priority, so we can define a specific version of some ORMs and one common function for the rest of ORMs.
Order and prefixes are defined in following list. At first ORM Designer tries to find the function with “MVC.ORM.” prefix. As next ORM Designer tries “ORM.” prefix, then “default.” and then without prefix.
ORM Designer stops the function search after a function with correspond name has been found .
So, when you have following definitions, if project using Doctrine ORM is being processed, the first function will be called. When processed project uses any other ORM, the second function is called:
Now, if you need to create a custom function which is called anytime when ORM Designer exports model to ORM Definitions, follow next steps. As first, we create a file onfinish-export.uscript.xml (or any other name with “.uscript.xml” extension) in user configuration directory (more about user configuration files). As next, enter following script snippet to the created file:
Now, every time when ORM Designer exports a model it will execute one of these functions, based on the project ORM type.
Conclusion
Currently, a support for user-callbacks in scripts is limited only to export scripts. In future, we would like to add more callbacks places depending on users’ requirements. If you have any questions about this topic, feel free to contact us.
In this short tip I want to show you how to share modules (plugins) bewteen serveral ORM Designer projects.
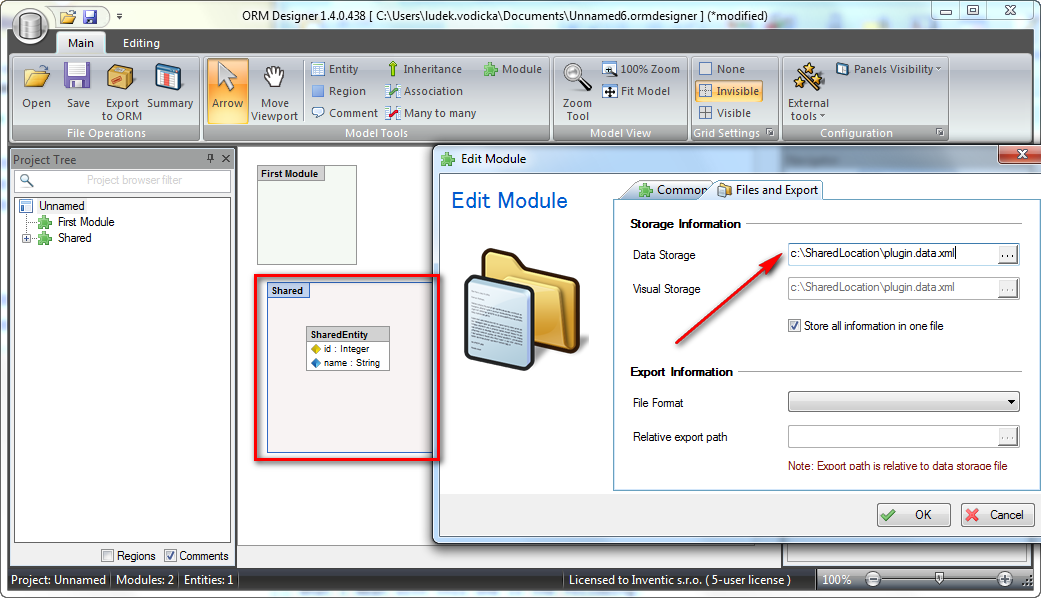
Save module to shared location
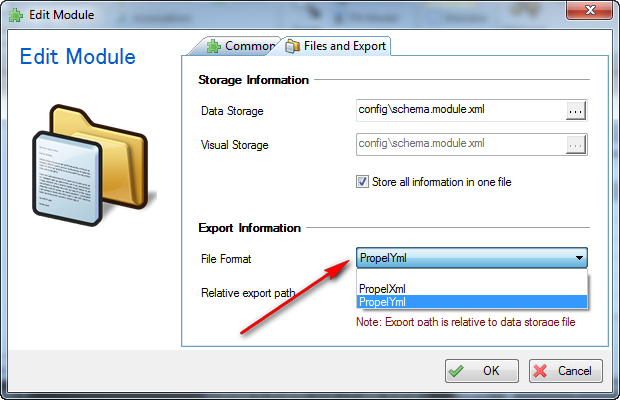
As first step you can create or select any module you want to share among several projects and double click on it. As the next step select “Files and export” tab and enter a path to the shared directory to the “Data storage” edit window. In our example we store shared module in the location c:\sharedlocation\plugin.data.xml. The situation looks as in our first screenshot:
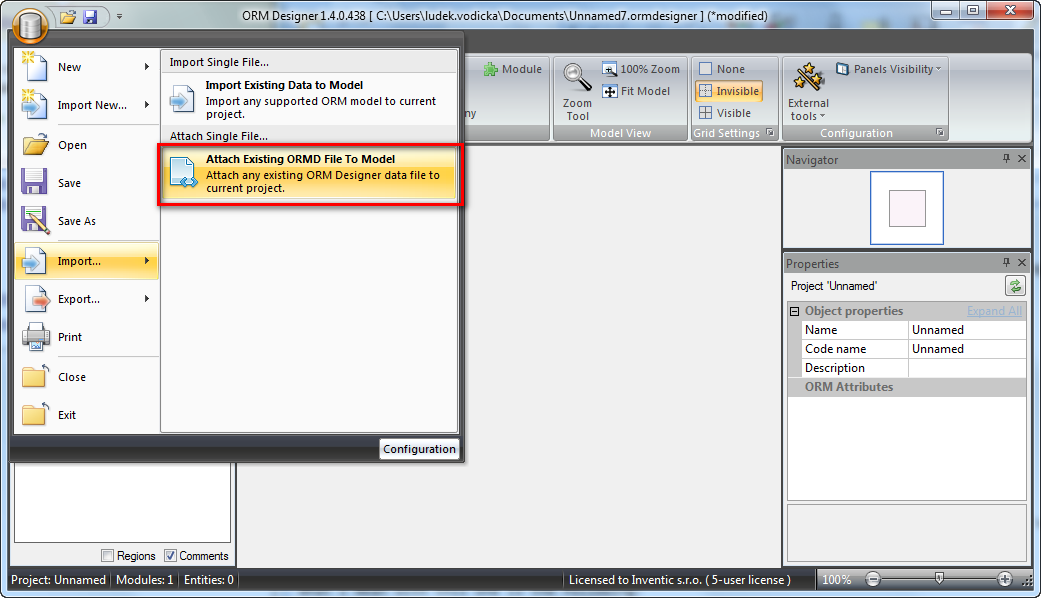
Import existing module
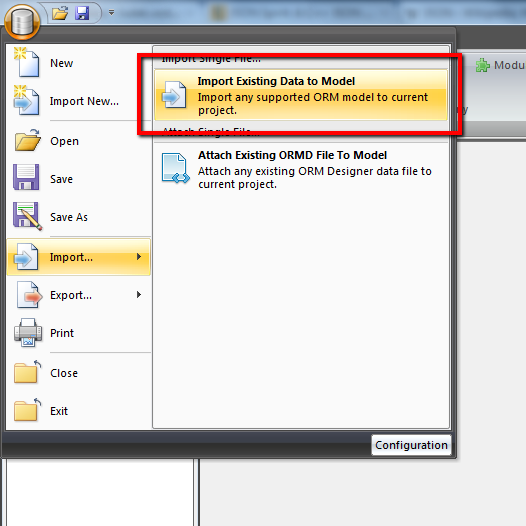
As the third step, open any project where you want to use this shared module. After that, select “Attach existing ORMD file to model” from “Import” menu.
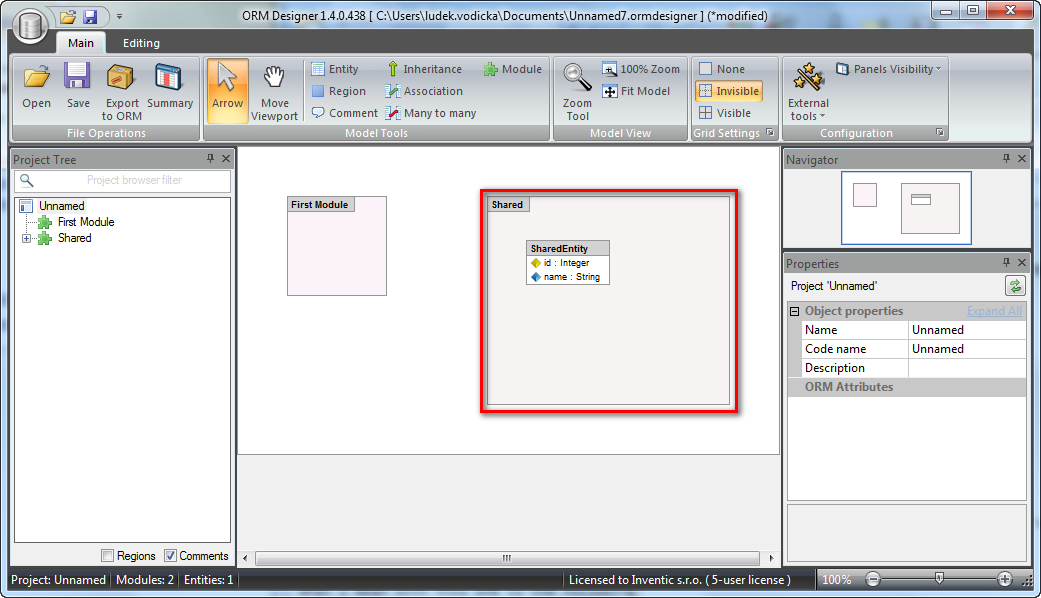
Shared module in another model
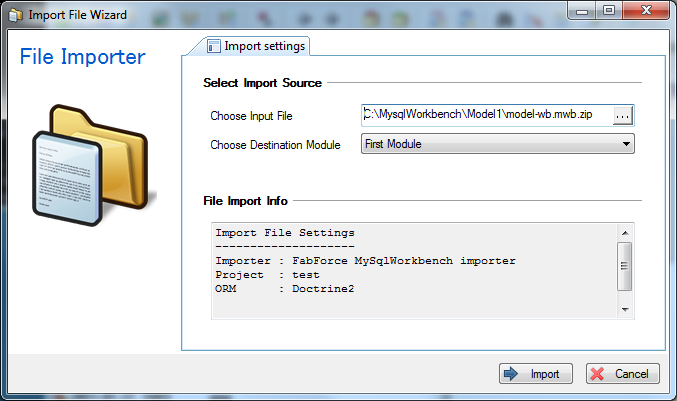
In “open file” window select shared module data file. In our case we select file c:\sharedlocation\plugin.data.xml and click OK. After that shared module is attached to the model.
Conclusion
By using this technique you can share your models among several projects with minimal effort. Instead of repeatable creating of entities over and over again you can simply attach your shared modules to any project. And every change you create in the shared module will be automatically shared in all your models. This behavior can be used in any ORM framework (PHP Doctrine, Doctrine2, Propel or CakePHP).
Today I want to show you a new feature of ORM Desigener for Doctrine ORM. It is an ability to define prefix for a whole module by which ORM Designer exports every entity with a name composed of this prefix and stand-alone name. In the past we received several requests from Zend Framework users for this feature, so here it is ;-).
This feature is the most useful for Zend Framework users, but might be used by every Doctrine ORM user. When using Doctrine ORM with Zend Framework you have to create the names of your entities with prefixes as Default_Model_Entity_Name or Forum_Model_Entity_Name (more about this topic is described in the article Doctrine1 Integration with Zend Framework).
And how does it work? Here is a screenshot of an example model:
In this model we’re using simple and nice entity names like “parent” or “child”. To “entity_prefix” attribute of each module we enter common prefix for all entities. After that when we export the model to the YAML file, we get a following result: